

Even tho there are countless tutorials to setting up and hosting your own Minecraft server it is still a bit confusing expecially when it comes to port forwarding. Here we will show you how you can set up your server and how your friends can connect to it with and without port forwarding.
1. Download the server files
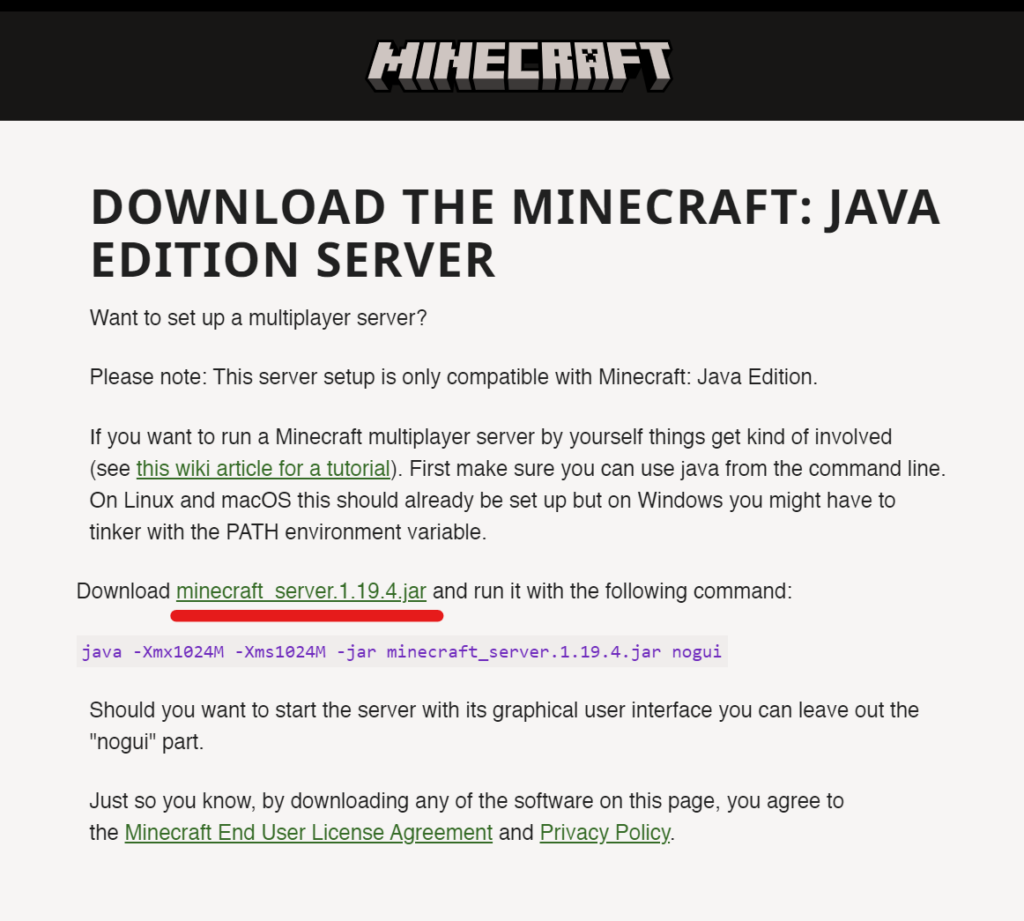
To create your own Minecraft server, you will need to download the server software from the official Minecraft website. Go to the Minecraft downloads page and click on “minecraft server.x.x.x.jar” to download the latest version of the server software.
Alternative server files
Apart from the official server there are also many modified versions with improvements regarding the performance especially on low end hardware. One of the best and easiest options I have come across is PaperMC as it offers a lot more speed if you are for example hosting you server on a RaspberryPI.
2. Install Java
Minecraft requires Java to run, so you will need to install Java on your computer if you haven’t already (make sure its the jdk version). To install Java, go to the official Java website and download the latest version of Java for your operating system. Follow the on-screen instructions to install Java on your computer.
3. Set up folder structure
Create a new folder on your computer to hold all the server files. You can name the folder whatever you like. It’s a good idea to use a new and empty folder so that all the server files are organized in one place. This will also make it easier to find and manage the server files later.
To start the server later on, it is also advised to create a new .bat file that can be executed. It should contain:
java -Xmx1G -jar SERVER_FILE_NAME.jar and should be saved as start.bat it in the same directory where the minecraft SERVER_FILE_NAME.jar file is located. Before doing this make sure that you have changed the placeholder “SERVER_FILE_NAME.jar” to the real name of your .jar file!

Your folder should now look like this:
4. Configure server settings
After you’ve finished setting the start script up, execute it and wait for the server to generate the settings file and the EULA.txt file. Open the EULA file with a text editor like Notepad or Wordpad, change the value to eula=true and save it again.

The other file is the settings file of the server named server.properties.
There are many settings you can change, but some of the most important ones are:
- Game mode: This determines whether the game is in survival mode, creative mode, or adventure mode.
- Difficulty level: This determines how many mobs are spawned and the general difficulty.
- Max players: This sets the maximum number of players that can join the server at one time.
- Server name: This sets the displayed name of your server.
You can also set other settings like game rules, spawn settings, and more but this is not all to important at the moment. Once you’ve configured the settings to your liking, save the file and close the text editor.
5. Start the server
Upon executing the start.bat file the server should now start without any problems and you should be greeted by the simple server user interface showing you the current RAM usage as well as the log and chat on the right.

To test the Minecraft server and connect with it you need to know its IP meaning the IP of your server PC. Open your command line and type
ipconfig
which prints out all the IP addresses of your machine.
After finding your IPv4 address go into Minecraft and connect to your very own server to ensure that it is running fine. Do this by going on the multiplayer button > add server > enter your IP and hit connect.

6. Ports
Even tho having done the server part itself, the most problems will probably occur when trying to give friends access to your new Minecraft server. This is because you need to give devices from the internet permission to access a device within your home network. In this case that’s your Minecraft server with the IP address you found earlier.
Port forwarding
This can be done with port forwarding which tells your router which devices are allowed to be accessed (and on which port). For Minecraft Java Edition these ports are TCP 25565 and UDP 25565. The IP address is the same as above.

IPv4 tunnel server
Although that sounds fairly easy there is an increasing number of internet connections that don’t get there own IPv4 addresses anymore which means that the server will only be accessible over IPv6. To fix this you could rent a server with a public IPv4 address to tunnel the IPv6 packages from your home minecraft server through it resulting in your minecraft server being accessible by anyone.
Because it is mostly complete overkill to rent and set up a whole root server to tunnel your packages we offer you this service for a fair price. You will simply get a script from us that will tell the tunnel server your minecraft servers current IPv6 address which it will then tunnel to a static non changing IPv4 address.
Note: you will still need port forwarding and your server will still need to be accessible from outside your home for this to work in the first place.
Should you be interested in this offer write an E-Mail to lj.server.info@gmail.com and we will try our best to give you an affordable public and static IPv4 address for your server.
NGrok
NGrok is a good alternative if you don’t want to open any ports on your router at all. Although it doesn’t offer the same convenience as a static IP because you have to tell your friends the new IP every time you restart the server. You can install it here and run it in the command line by typing:
ngrok tcp 255657. Giving it more power!
If you want to have more than 3 people on your server it is advised to allocate more RAM to the server which make the whole experience a lot smother for the users. This can simple be done by modifying the start.bat file:
java -Xmx_AMOUNT_OF_RAM_G -jar SERVER_FILE_NAME.jar Having done this you can now put your desired amount of RAM in Gigabytes where the placeholder _AMOUNT_OF_RAM_ is. Make sure to leave a bit free room for the rest of your PC!
8. Enjoy!

Enjoy playing Minecraft with your friends on your new server! If your asking yourself why this blocky game even became so popular you might be interested in our article regarding the indisputable success of the game. Or if you are interested in more pixel games check out our article on Knights of Pen and Paper 2. Have fun!


Pingback: How to install FiveM on home hosted Linux servers - games.lars-projects.com
Your point of view caught my eye and was very interesting. Thanks. I have a question for you.
I don’t think the title of your article matches the content lol. Just kidding, mainly because I had some doubts after reading the article.
Your point of view caught my eye and was very interesting. Thanks. I have a question for you.
Your article helped me a lot, is there any more related content? Thanks!
I don’t think the title of your article matches the content lol. Just kidding, mainly because I had some doubts after reading the article.
Your point of view caught my eye and was very interesting. Thanks. I have a question for you.
Hi, its pleasant post concerning media print, we all know media is a enormous source of facts.
It’s nearly impossible to find educated people about this topic, however, you sound like you know what you’re talking
about! Thanks
Nice answers in return of this matter with real arguments
and explaining the whole thing about that.
Thanks for the marvelous posting! I certainly enjoyed reading it, you will be a great author.I
will remember to bookmark your blog and will come back at some point.
I want to encourage you to continue your great job, have a nice evening!
Can you be more specific about the content of your article? After reading it, I still have some doubts. Hope you can help me.
Heya! I just wanted to ask if you ever have any issues with hackers?
My last blog (wordpress) was hacked and I ended up losing many months of hard work due to no back up.
Do you have any methods to protect against hackers?
Attractive section of content. I simply stumbled upon your website and in accession capital to assert that I get in fact loved account
your weblog posts. Anyway I’ll be subscribing on your feeds or even I
achievement you get right of entry to constantly quickly.
Hello there! I just wish to give you a huge thumbs up for your excellent info
you’ve got here on this post. I will be coming back to your website for more soon.
Greetings! Very helpful advice in this particular article!
It is the little changes that produce the most significant changes.
Thanks for sharing!
Great post. I was checking continuously this blog and I’m impressed!
Extremely useful info specifically the last part 🙂 I care for
such information much. I was seeking this particular info for a very long time.
Thank you and best of luck.
Hey there, I think your site might be having browser compatibility
issues. When I look at your blog site in Ie, it looks fine but when opening in Internet Explorer, it has some overlapping.
I just wanted to give you a quick heads up!
Other then that, great blog!
I am sure this post has touched all the internet people, its
really really pleasant paragraph on building up new weblog.
I think that everything published was actually very logical.
However, think on this, suppose you were to create a awesome headline?
I am not suggesting your information isn’t good., but suppose you added a headline that grabbed people’s attention? I mean How
to create your own Minecraft Server 2023 – Step by
Step Guide is kinda boring. You ought to glance at Yahoo’s front page and see how they create post headlines
to get viewers to click. You might add a video or a picture or two to grab people interested about what you’ve got to say.
Just my opinion, it could make your website a little
bit more interesting.
Everything is very open with a really clear description of the
challenges. It was really informative. Your site is very useful.
Many thanks for sharing!
Hi my friend! I wish to say that this article is
awesome, great written and include almost
all vital infos. I’d like to peer extra posts like
this .
Hiya very cool site!! Man .. Excellent ..
Amazing .. I will bookmark your web site and take the
feeds also? I’m happy to seek out a lot of helpful information here in the put
up, we’d like work out extra techniques on this regard, thank you for sharing.
. . . . .
It’s remarkable designed for me to have a web page, which is useful for my know-how.
thanks admin
Fantastic items from you, man. I’ve understand your stuff previous to and you’re just too magnificent.
I actually like what you have received here, certainly like what you’re stating and the
way in which wherein you assert it. You make it enjoyable and you continue
to take care of to keep it sensible. I cant wait to read much more from you.
This is really a wonderful web site.
This blog was… how do I say it? Relevant!! Finally I’ve found something that
helped me. Thank you!
You can definitely see your skills in the article you write.
The world hopes for more passionate writers such as you who are not
afraid to say how they believe. At all times go after your heart.
Your article helped me a lot, is there any more related content? Thanks!
Thanks for sharing. I read many of your blog posts, cool, your blog is very good.
Your point of view caught my eye and was very interesting. Thanks. I have a question for you.
Drill pipes transmit torque, power, and drilling fluid to the bit while withstanding extreme
stress. Available in various grades and sizes, they are engineered to deliver efficient, safe, and reliable drilling performance across oil, gas, and water well projects.
Mud pumps are key drilling machines, providing continuous circulation of
drilling mud to stabilize the borehole, cool the drill bit, and
optimize penetration. Durable designs handle
high pressures and long operating hours.
Thank you for the auspicious writeup. It in fact
was a amusement account it. Look advanced to more added agreeable from you!
By the way, how could we communicate?
Холодные кисти и артрит
Когда холодные руки – сигнал тревоги?
Буровые насосы рассчитаны на бесперебойную работу даже
при экстремальных нагрузках.
Они поддерживают стабильный поток
бурового раствора, обеспечивая эффективность бурения и защиту оборудования на скважине.
Спутниковое ТВ для русскоязычных в Европе
Монолитный поликарбонат в стрельбе
I love looking through a post that will make men and women think.
Also, thanks for allowing for me to comment!
Отрезки 5,3 м: удобство в установке затворов
Фарфоровая плитка для душевых в бассейнах
WOW just what I was looking for. Came here by searching
for words of wonders
Добрый день!
ЭБУ Cummins (блок управления двигателем) — «мозг» всей системы. Его программный сбой может имитировать аппаратные неисправности. Обновление прошивки решает многие «призрачные» ошибки. Не вскрывайте ЭБУ без защиты от статики — это убивает микросхемы. В блоге — как безопасно обновить ПО и сбросить адаптации.
Вся информация на сайте https://pro-cummins.ru/category/sravnenie-serij-i-modelej-cummins/
шум при работе Cummins, Cummins INLINE, ТО для автобуса с Cummins
ошибки Euro 3 Cummins, вибрация Cummins на холостом ходу, ISB6.7 CM850
Удачи и комфортной езды!
Outstanding post but I was wanting to know
if you could write a litte more on this subject?
I’d be very grateful if you could elaborate a little bit more.
Thank you!
Hey there! I just would like to give you a big thumbs
up for the excellent info you have got right here on this post.
I am returning to your blog for more soon.
Your point of view caught my eye and was very interesting. Thanks. I have a question for you.
эскорт уфа подработка для студенток
Худенькая топ 20+ — кто брал?
Банкротство физических лиц в Калуге регулируется федеральным законом о банкротстве
банкротство физических.
Процедура позволяет гражданам, не способным
погасить долги, избавиться от финансовых обязательств.
Undeniably imagine that that you said. Your favourite reason appeared to be on the net the easiest thing to keep in mind
of. I say to you, I certainly get irked while people consider concerns that they just do not realize about.
You managed to hit the nail upon the top as neatly as defined out the entire thing with no need
side-effects , other people can take a signal.
Will probably be back to get more. Thanks
Кто из королей был на Little St. James
снег остановил город но ускорил бабки
Your article helped me a lot, is there any more related content? Thanks!
中国 エロWhat more? 235 Con?ult the Almanack-man which would be lea?t? Which cleanelie?t? And which ?ilente?t? This wel,madame! And while ?he were with puppy? Walke her ou And ayre her euery morning! Very good! And be indu?trious to kill her fleas? 240 Yes! He will make a pretty proficien Comming from Hell,
This design is spectacular! You most certainly know how to
keep a reader amused. Between your wit and your videos,
I was almost moved to start my own blog (well, almost…HaHa!) Great job.
I really loved what you had to say, and more than that, how you
presented it. Too cool!